Server Side JavaScript
In this unit we are going to continue using Node.js to write server side JavaScript. We will also be importing modules (or packages) using npm. Finally, we will create our own custom modules.
NPM
NPM is a package manager for JavaScript. It is used to install and manage packages. It is also used to manage dependencies in a project.
NPM comes pre-installed with Node.js. To check the version of NPM installed on your machine, run the following command in your terminal:
npm -v
Using NPM and Installing Packages
Before we can import packages using NPM, we need to create a package.json file. This file contains information about the project and the packages that are used in the project.
To create a package.json file, you can run the following command in your terminal, then follow the prompts:
npm init
Note
npm doesn't always play nicely with certain terminals, like Powershell for windows users. You can change your terminal to Command Prompt (cmd) or Git Bash to avoid issues:
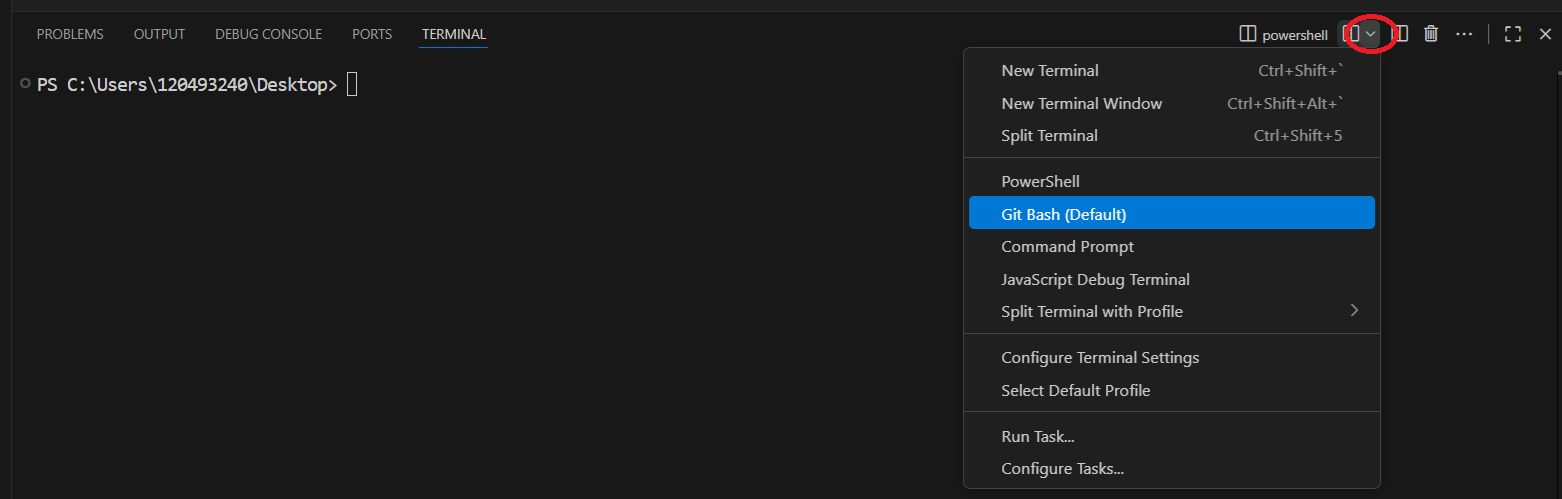
Now that we have a package.json file, we can start install and use packages in our project.
We're going to install a package called ansi-colors to demonstrate how to install packages using NPM.
ansi-colors is a package that allows you to add color to your terminal output. It is a great package to use when you want to add some color to your terminal output.
To install a package, you can use the npm install command followed by the name of the package. For example, to install the ansi-colors package, you would run the following command:
npm install ansi-colors
You can also shorten the install command to npm i:
npm i ansi-colors
This video will walk you through the previous steps, and then show you how to use the ansi-colors package:
Show/Hide Video
Often times, npm packages will have documentation and examples on their NPM page. This is a great place to start when learning how to use a new package.
Here is the link to the ansi-colors package on NPM. If you haven't already, take a minute to scan throught the documentation.
To use a package in your project, you need to import it into your JavaScript file. You can do this using the require function.
Here is the code from the video:
const colors = require('ansi-colors')

console.log(colors.red("red text"))
console.log(colors.green("green text"))
console.log(colors.blue("blue text"))

console.log(colors.bgRed("red background"))

console.log(colors.black.bgWhite("black text, white background"))
Note
The documentation uses the variable name c to import the ansi-colors package. I chose to use the variable name colors instead, because I think it makes the code more readable. You can use any variable name you like.
Node Modules and .gitignore
When you install a package using NPM, it is stored in a folder called node_modules. This folder is created in the root of your project. It contains all the packages that are installed in your project.
This folder can get notoriously large. So much so, that it has spawned multiple memes. Including this one:

Because of this, it is common practice to not include the node_modules folder in your git repository. Instead, you can add a .gitignore file to your project and add the node_modules folder to it. This will prevent the node_modules folder from being included in your git repository.
This video will walk you through the process:
Show/Hide Video
If you are cloning an existing project from a git repository, you will need to run the npm install command to install all the packages that are used in the project. This command will read the package.json file and install all the packages that are listed in it.
Node Fetch
Node Fetch is a package that allows you to make HTTP requests in Node.js. It is similar to the fetch function that is available in the browser.
We are going to be using a specific version of the node-fetch package. This version is node-fetch@2.7.0. We are going to use this version because it uses the same require syntax, that we already have experience with.
Show/Hide Video
To install the node-fetch package, you can run the following command:
npm i node-fetch@2.7.0
And here is the code from the video:
(async () => {

    const fetch = require('node-fetch')

    const url = 'https://pokeapi.co/api/v2/pokemon/ditto'

    const response = await fetch(url)
    const json = await response.json()

    const { name, id, height, weight } = json
    console.log({ name, id, height, weight })

})()
Exercise 1
Show/Hide Video
The pokeAPI has a lot of information about pokemon. One of the things it has is "PokemonColor". According to the API:
"Colors used for sorting Pokémon in a Pokédex. The color listed in the Pokédex is usually the color most apparent or covering each Pokémon's body. No orange category exists; Pokémon that are primarily orange are listed as red or brown."
For this exercise, I want you to make a variable called "color" that will contain the color of the pokemon. You will then use fetch to get all of the pokemon-species that match that color, and use the ansi-colors package to display the names of the pokemon in that color.
The url for the pokemon-species is:
const url = `https://pokeapi.co/api/v2/pokemon-color/${color}`
To get the console to log the correct color you can use the following code:
console.log(colors[color](pokemon))
Hints
How do I get the species of the pokemon based on color?
You can use the fetch function to get the species of the pokemon based on color. For example:
const response = await fetch('https://pokeapi.co/api/v2/pokemon-color/red') // get the "red" pokemon
const json = await response.json()
console.log(json)
How do I get the name of the pokemon from the result?
The result object has an array called "pokemon_species". You can loop through this array to get the name of each pokemon. For example:
const { pokemon_species } = json
pokemon_species.forEach(pokemon => {
    console.log(pokemon.name)
})
Solution
Show the Answer
(async () => {

    const colors = require('ansi-colors')
    const fetch = require('node-fetch')

    const color = 'red'

    const url = `https://pokeapi.co/api/v2/pokemon-color/${color}`
    const response = await fetch(url)
    const json = await response.json()

    const { pokemon_species } = json
    pokemon_species.forEach(pokemon => {
        console.log(colors[color](pokemon.name))
    })

})()
Walkthrough Video
Custom Modules
In addition to using packages from NPM, you can also create your own custom modules. A module is a file that contains JavaScript code. You can export code from a module using the module.exports object. You can then import the code from a module into another file using the require function.
This is a great way to organize your code and make it more readable.
This video will walk you through the process:
Show/Hide Video
Exporting Classes
You can also export classes from a module.
This video will show you how:
Show/Hide Video
Here is the code from the video:
test-class.js:
class Person {
    firstName

    constructor(firstName) {
        this.firstName = firstName
    }

    greet() {
        console.log(`${this.firstName} says hi!`)
    }
}

module.exports = Person
app.js:
const Person = require('./test-class')
const ryan = new Person('Ryan')
ryan.greet()
Note
module.exports is not the only way to export code from a module. You can also use exports instead of module.exports. It works a bit differently, but it is also a valid way to export code from a module, I just choose not to use it.
Exporting Objects and Functions
You can also export objects and functions from a module. I find doing this is easier to understand than exporting classes.
This video will show you how:
Show/Hide Video
Here is the code from the video:
test-functions.js:
const createPerson = firstName => {
    return { firstName }
}

const greet = person => {
    console.log(`${person.firstName} says hi!`)
}

module.exports = { createPerson, greet }
app.js:
const { createPerson, greet } = require('./test-functions')
const ryan2 = createPerson('Ryan')
greet(ryan2)
Or if we just want to export a single function:
test-function.js:
const createPerson = firstName => {
    return { firstName }
}

module.exports = createPerson
app.js:
const createPerson = require('./test-function')
const ryan3 = createPerson('Ryan')
console.log(ryan3)
Exercise 2
Show/Hide Video
For this exercise, I want you to create a custom module called pokemon.js that export a function. This function will return a random pokemon from the pokeAPI. You will then import this module into your app.js file and use the function to get a random pokemon.
Hints
How do I create a custom module?
To create a custom module, you can create a new JavaScript file and export the code using the module.exports object. For example:
const getRandomPokemon = async () => {
    return 'random pokemon'
}

module.exports = getRandomPokemon
Or you could do:
module.exports = () => {
    return 'random pokemon'
}
How do I import a custom module into my app.js file?
To import a custom module into your app.js file, you can use the require function. For example:
(async () => {

    const getRandomPokemon = require('./random-pokemon')
    const pokemon = getRandomPokemon()
    console.log(pokemon)

})()
Solution
Show the Answer
pokemon.js:
const fetch = require('node-fetch')

const getRandomPokemon = async () => {

    const url = `https://pokeapi.co/api/v2/pokemon/${Math.floor(Math.random() * 807) + 1}`
    const response = await fetch(url)
    const json = await response.json()

    const { name, id, height, weight } = json
    return { name, id, height, weight }
}

module.exports = getRandomPokemon
app.js:
(async () => {

    const getRandomPokemon = require('./pokemon')
    const randomPokemon = await getRandomPokemon()
    console.log(randomPokemon)

})()